How to Buy a Surf Training Bodyboard That Fits Your Skill Level

How to Choose the Best Budget Mountain Bike for Trail Riding
June 19, 2026
You’ve watched the pros glide down the face of a wave, and you feel that pull—the urge to get out there and feel that same rush. But every time you step into a surf shop, you’re hit with a wall of foam, slick bottoms, and confusing specs. You want a board that actually helps you learn, not one that fights you. The truth is, buying the wrong bodyboard can make your first sessions frustrating and exhausting. Whether you’re a total rookie or looking to refine your skills, you need surf training bodyboards that match exactly where you are right now. This guide breaks down every spec, shape, and material so you walk away with a board that feels like it was custom-built for your progression.
What Makes a Bodyboard a Surf Training Board?
A surf training bodyboard is designed specifically to help you catch waves more easily, maintain stability while paddling, and learn proper body positioning without fighting the board. Unlike a high-performance model built for advanced spins and barrels, a training board prioritizes flotation, forgiveness, and control. It is the tool that builds your foundation before you ever need to think about rails or aerial maneuvers.
Core Features of a Training Bodyboard
Training boards typically have a wider nose, thicker core, and softer bottom materials. These features create buoyancy that supports your upper body while you paddle, making it easier to catch small, weak waves. They also reduce the likelihood of the nose pearling (digging into the water) during your first pop-ups.
How It Differs from a Standard Bodyboard
A standard bodyboard might be narrower or have a slick bottom designed for speed and maneuverability on steep waves. Training boards trade some of that speed for stability. They allow you to make mistakes—like shifting your weight too far forward—without immediately wiping out.
Why Beginners Need a Dedicated Training Board
If you start on a board that is too small or too stiff, you will spend more time swimming than surfing. A training board keeps you on the wave longer, giving you more repetitions per session. More reps equal faster muscle memory and quicker progression.
Which Bodyboard Size Is Right for Your Height and Weight?
Your board size is the single most important factor in whether you enjoy your first months of bodyboarding. The general rule: stand the board on its tail—it should reach somewhere between your belly button and your chest. If it is shorter than that, you will struggle with flotation. If it is taller, you will have trouble controlling it under your arms.
Using a Simple Size Chart
Manufacturers provide size recommendations based on rider weight. For example, a rider weighing under 55kg (120 lbs) typically needs a 38–40 inch board. Riders between 55–75kg (120–165 lbs) should look at 40–42 inches. Heavier riders over 75kg need 42–44 inches. Always cross-reference this with your height to ensure the board sits comfortably under your torso.
The Danger of Buying a Board That Is Too Small
A small board sinks under your chest, forcing you to paddle harder and use more energy. This leads to early fatigue and fewer waves caught. It also makes you prone to nose-diving because your weight is concentrated over a smaller surface area.
When to Size Up for Training
If you are between sizes, always choose the larger board for training. More foam under your chest gives you extra stability while you learn to read waves and time your paddling. You can move down to a smaller board once you can consistently catch green waves unassisted.
How Does Core Material Affect Learning Speed?
The core material determines the board’s buoyancy, flexibility, and overall feel in the water. For training purposes, you want a core that is buoyant but not overly soft. The two most common materials for surf training bodyboard beginner bodyboards are polyethylene (PE) and polypropylene (PP), with PE being the most forgiving for new riders.
Understanding Polyethylene (PE) Cores
PE cores are softer, heavier, and more flexible. They offer a slower, more predictable ride that is ideal for learning wave timing and bottom turns. The flex absorbs your mistakes, making the board feel glued to the water rather than bouncing off it.
Understanding Polypropylene (PP) Cores
PP cores are lighter, stiffer, and faster. While advanced riders love them for speed, beginners often find them too slippery and unforgiving. If you are just starting, avoid pure PP until you can consistently generate your own speed down the line.
Why Stringers Actually Help Beginners
A stringer is a rod of carbon fiber or plastic embedded in the core. It adds stiffness and prevents the board from folding on steep drops. For a training board, a single stringer is perfect—it adds durability without making the board too rigid.
What Slick Bottom Material Should a Beginner Choose?
The slick bottom is the plastic laminate on the underside of the board that allows it to slide over the water. For training, you want a slick material that provides moderate speed without being too fast. High-end materials like HDPE (High-Density Polyethylene) can be too quick for a learner, making it harder to control direction.
HDPE for Durability
HDPE is the most common slick material. It is tough, resists cracking, and provides good speed. For a training board, this is your best choice. It will last through the inevitable bumps and drags across sand and rocks.
S-Slick for Slightly More Grip
Some brands offer an S-Slick or textured slick. This material provides a bit more grip on the wave face, which helps with learning how to engage your inside rail during turns. It is a good upgrade if you plan to keep the board for a full season of progression.
When to Avoid Ultra-Fast Slicks
Surfboard-style polyester resin slicks are extremely fast and slippery. For a training board, they make it harder to feel the water and control your speed. Stick with standard HDPE until you are comfortable with bottom turns and cutbacks.
Which Bodyboard Shape Helps You Catch More Waves?
The shape of the board’s nose and tail determines how it interacts with the wave face. For a training board, you want a shape that prioritizes wave-catching ability over aerial performance. A rounded nose and a crescent tail are the most forgiving combination for new riders.
The Benefits of a Rounded Nose
A rounded nose (often called a “battail” or “rounded square” nose) prevents the board from digging into the water during takeoff. It also provides more surface area, which helps with paddling stability. A pointed nose, while faster, is prone to pearling if your weight shifts forward.
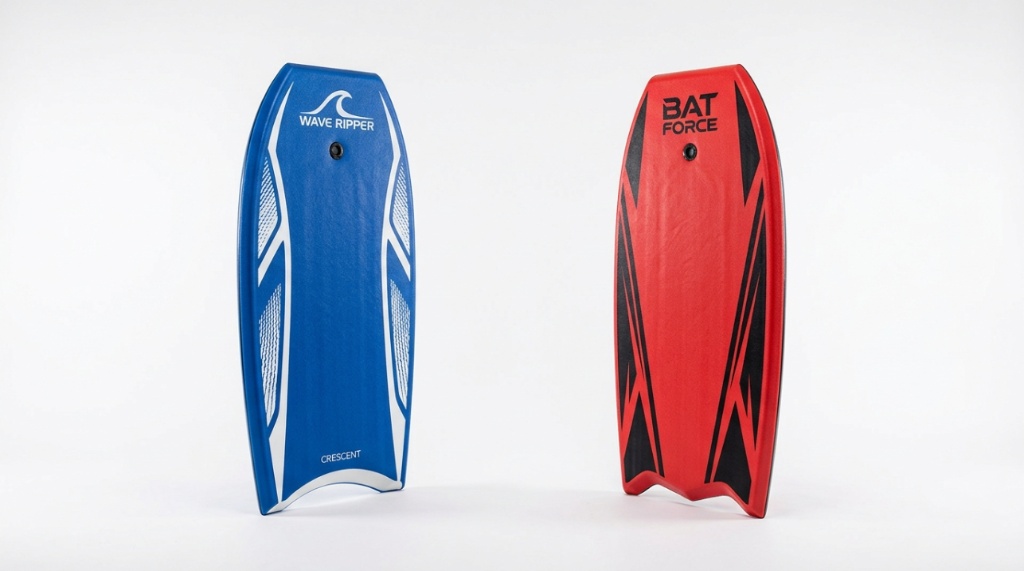
Crescent Tail vs. Bat Tail for Training
A crescent tail—curved inward like a smile—grips the wave during turns and prevents the tail from sliding out. This is essential for learning how to pivot and change direction. A bat tail, which is wide and flat, offers more speed but less control. Choose crescent for training.
Rail Shape and Its Impact on Learning Turns
Rails are the board’s edges. Soft, rolled rails are forgiving and allow the board to slide slightly during turns. Hard, sharp rails catch the water and create instant grip. For training, look for soft to medium rails. They reduce the likelihood of catching an edge during your first side-to-side weight shifts.
How to Choose a Bodyboard Based on Your Local Waves?
Not all waves are the same, and your board choice should match the typical conditions you will ride. If your local break is a slow, mushy beach break, you need a different board than if you ride a steep, hollow reef break. Matching the board to your wave type makes training much more enjoyable.
Boards for Small, Slow Waves
If you primarily ride knee-to-waist high waves, look for a board that is slightly thicker (around 2.25 inches) and has a wider nose. This maximizes flotation so you can catch even the weakest swells. A PE core with a soft rail works best here.
Boards for Steep or Hollow Waves
If your local break has fast, pitching waves, you need a board with a bit more flex and a slightly narrower nose to help you drop in without nosediving. A single-stringer PE board with a crescent tail gives you the control needed to handle steeper takeoffs.
General Purpose Board for Most Beginners
For almost all beginners learning in typical 1-3 foot beach breaks, a 41-42 inch PE board with rounded nose, crescent tail, and HDPE slick is the gold standard. It is versatile enough to handle small summer swells and forgiving enough for chest-high winter waves.
What Bodyboard Brand Offers the Best Value for Beginners?
You do not need to spend hundreds of dollars to get a quality training board. Several reliable brands build durable, well-performing boards at reasonable price points. The key is to avoid generic no-name boards that may have poor core density or slick material that peels after a few sessions.
Top Beginner Brands to Consider
Brands like BZ (BZ Bodyboards), Morey, and Tribe are trusted in the industry for their entry-level and intermediate boards. They use quality PE cores and durable HDPE slicks. These boards are designed specifically to take the abuse of learning without breaking the bank.
What to Look for in a Budget-Friendly Board
Check that the board has a heat-laminated slick (which bonds the bottom layer to the core) rather than a glued-on slick. Glued slicks peel off quickly. Also ensure that the leash plug is flush with the surface to avoid drag and snagging. You can find excellent options when you search for the best surf training bodyboard beginner bodyboards that prioritize these quality details over brand hype.
Why You Should Avoid the Absolute Cheapest Options
Extremely cheap boards (under $40) often use low-density foam that waterlogs after a few uses. They also have poor shape design that actually makes learning harder. Investing a little more upfront saves you frustration and the cost of replacing a ruined board two months later.
How Important Is the Leash for Training?
The leash is not an afterthought—it is a critical safety and convenience component for training. A good leash keeps your board close after a wipeout, preventing you from swimming long distances to retrieve it. For a beginner, a leash that is too short or too long can cause problems.
Correct Leash Length for a Training Board
Your leash should be roughly the same length as your board, or slightly longer. A 38-40 inch board takes a 38-40 inch leash. A leash that is too short will yank your board toward you awkwardly during a wipeout, while a leash that is too long can tangle around your legs.
Coiled vs. Straight Leashes
Coiled leashes are popular because they stay close to your wrist or bicep and avoid dragging in the water. Straight leashes are simpler and less expensive. For a training board, a straight leash is fine and easier to coil manually after your session.
Choosing the Right Coil Attachment
Look for a leash with a Velcro cuff that has a quick-release tab. Standard double-G-hook coils are reliable, but ensure the leash string is thick enough (at least 2mm) to handle twisting forces. A broken leash during a session can end your day early and ruin your momentum.
Can You Use a Handboard or Fin Accessories to Improve Training?
Accessories like handboards and swim fins are not mandatory, but they significantly change how your bodyboard performs during training. Correctly used, they accelerate your learning curve by forcing you to focus on specific movements like arm placement or kicking power.
When to Add a Handboard
A handboard is a small piece of foam that fits in your hand, allowing you to “paddle” with a single hand while the other remains free. This forces you to rely more on body positioning and weight shifting than on arm strength. It is excellent for intermediate learners who want to refine their rail work.
Why Swim Fins Are Almost Essential
Swim fins double your paddle power and wave-catching ability. They also help you maintain speed on the wave face without needing to kick as hard. For a beginner, a pair of soft, flexible fins (like Churchill or Da Fin) are perfect—they provide power without cramping your feet. Choosing the right gear is only half the battle when tracking your favorite water sports. If you are looking for reliable ways to watch live surfing competitions or ocean sports online, check out our guide on the Best Alternatives to Elitegol for the top streaming platforms available right now.
How Wax or Deck Traction Changes Training
Most bodyboards come with a foam deck that provides natural grip. If your board feels slippery when wet, apply a thin layer of bodyboard wax. This prevents your chest and arms from sliding around as you shift weight, giving you more precise control during turns.
How to Test a Bodyboard Before You Buy?
If possible, handle the board before purchasing. Many surf shops allow you to stand the board on its tail or lie on it in the parking lot. A quick physical inspection can reveal if the board feels balanced and comfortable for your body.
The Balance Test
Hold the board by its leash plug and let it hang. It should sit level, not tilting heavily to one side. If it tilts, the foam may be unbalanced, which causes the board to pull to one side in the water.
The Flex Test
Press your thumbs into the center of the board’s deck. A good training board should have some give but not feel mushy. If your thumbs sink deeply, the core is too soft and will waterlog quickly. If it feels like a rock, it is too stiff for a beginner.
The Positioning Test
Lie on the board as if you are paddling. Your chin should rest just behind the nose of the board. If the nose is above your head, the board is too big. If the nose is under your forehead, it is too small. Adjust accordingly.
Frequently Asked Questions
Can I use a surfboard as a training bodyboard?
No. Surfboards are much longer and stiffer, making them difficult to paddle with your arms and impossible to turn with your body weight. A bodyboard is specifically designed for prone riding and knee riding, which are the primary techniques for learning.
How long should a beginner bodyboard last?
A well-made PE training board with a heat-laminated slick should last at least one full season of regular use (2-3 sessions per week). With proper care—rinsing with fresh water and storing out of direct sunlight—it can last two to three seasons.
Is a soft-top bodyboard better for beginners?
Soft-top bodyboards are generally lower quality and less durable than standard foam-core boards. While they are softer on impact, they lack the flex and performance needed for actual wave riding. Stick with a standard PE board for proper training.
Do I need a bodyboard with a stringer as a beginner?
Not necessarily, but it helps. A single stringer adds stiffness that prevents the board from folding on steep drops. If your local waves are over chest-high, a stringer is a good investment. For small, mushy waves, a non-stringer board works fine.
What is the best weight limit for a training bodyboard?
Most training boards are designed for riders up to 90kg (200 lbs). If you weigh more than that, look for a board labeled “XL” or “heavy rider” with a thicker core (2.5 inches or more). Standard boards will sink under too much weight.
Can I use a training bodyboard for advanced tricks later?
Training boards are optimized for learning, not for high-performance maneuvers. Once you progress to cutbacks, floaters, and aerial moves, you will need a stiffer, faster board with a PP core and sharp rails. Keep your training board as a backup for small-wave days.
Should I buy a board with a leash already attached?
Most bodyboards come with a leash plug but no leash. It is better to buy a leash separately and choose one that matches your board length and your preferred attachment style. Generic included leashes are often low quality and break easily.

