How to Assemble a Huffy Stone Mountain Bike the Right Way
Ideal AC settings for better sleep
April 21, 2026
Best Dyson Vacuums for Hardwood Floors That Don’t Scratch Your Surface
May 11, 2026
Most first-time bike assembly mistakes happen before the first pedal stroke, not on the trail. A loose headset, uneven handlebars, or incorrectly installed front wheel can turn a brand-new bike into a frustrating experience. This bike setup guide explains how to assemble a Huffy Stone Mountain bike the right way so it rides safely, shifts properly, and lasts longer from day one.
If you recently bought a Huffy Stone Mountain mountain bike, proper assembly matters more than most riders realize. Many budget mountain bikes arrive partially assembled inside the box, which means the final setup directly affects braking performance, gear shifting, comfort, and safety. Poor installation can lead to loose parts, wheel wobble, chain skipping, or premature wear.
This guide covers the complete process step by step using beginner-friendly instructions and practical mountain bike assembly tips. You’ll learn how to install the handlebars, front wheel, pedals, seat, brakes, and tires correctly while avoiding the common setup mistakes many new riders make.
Whether you are assembling a bike for commuting, trail riding, or casual weekend rides, this article will help you do it correctly without guessing.
What Is the Correct Way to Assemble a Huffy Stone Mountain Bike?
The correct way to assemble a Huffy Stone Mountain bike is to follow a systematic setup process that includes checking all factory-installed components, installing remaining parts properly, tightening bolts to safe torque levels, and testing brakes and gears before riding.
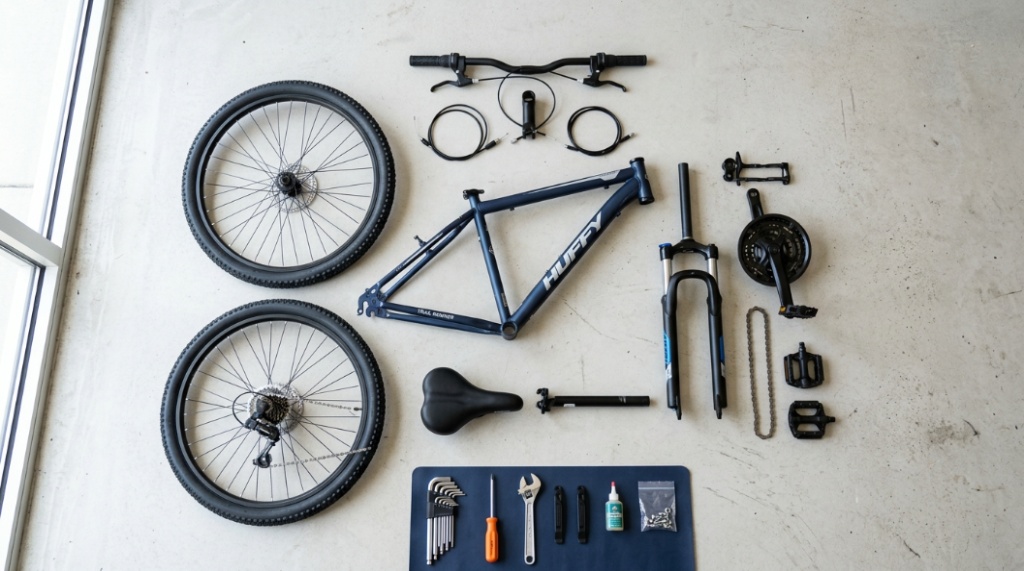
The Huffy Stone Mountain is shipped about 85% assembled. Typically, the rear wheel, drivetrain, and brake system are pre-installed. You usually need to install:
- Front wheel
- Handlebars
- Seat and seatpost
- Pedals
- Front reflector and accessories
- Tire inflation adjustments
Skipping inspection during assembly is one of the biggest problems with boxed bikes. According to multiple bicycle retailer service reports, improper assembly is responsible for many first-ride mechanical issues on entry-level bikes.
What Tools Do You Need to Assemble a Huffy Stone Mountain Bike?
You only need a few basic tools to assemble most Huffy Stone Mountain models safely and correctly.
Before opening the bike box, gather these tools:
| Tool | Purpose |
|---|---|
| Allen wrench set | Tightening handlebars, seat clamp, brake parts |
| Adjustable wrench | Installing pedals and axle nuts |
| Bike pump with pressure gauge | Inflating tires correctly |
| Phillips screwdriver | Reflectors and accessory installation |
| Grease | Pedal threads and seatpost protection |
| Torque wrench (optional) | Accurate bolt tightening |
Many riders skip grease during setup. That creates problems later because dry pedal threads and seatposts can seize over time due to corrosion.
How Do You Unbox and Inspect the Bike Properly?
The safest approach is to inspect every visible component before starting assembly.
Place the box on a flat surface and carefully remove packaging materials. Avoid using sharp blades deeply inside the box because brake cables and tire tubes can be damaged easily.
After unboxing, inspect:
- Frame for scratches or dents
- Brake cables for bends
- Wheel rims for wobbling
- Chain alignment
- Gear derailleur position
- Included hardware and accessories
If the rear derailleur appears bent inward toward the spokes, do not ride the bike until it is corrected. A bent derailleur hanger can cause chain failure during riding.
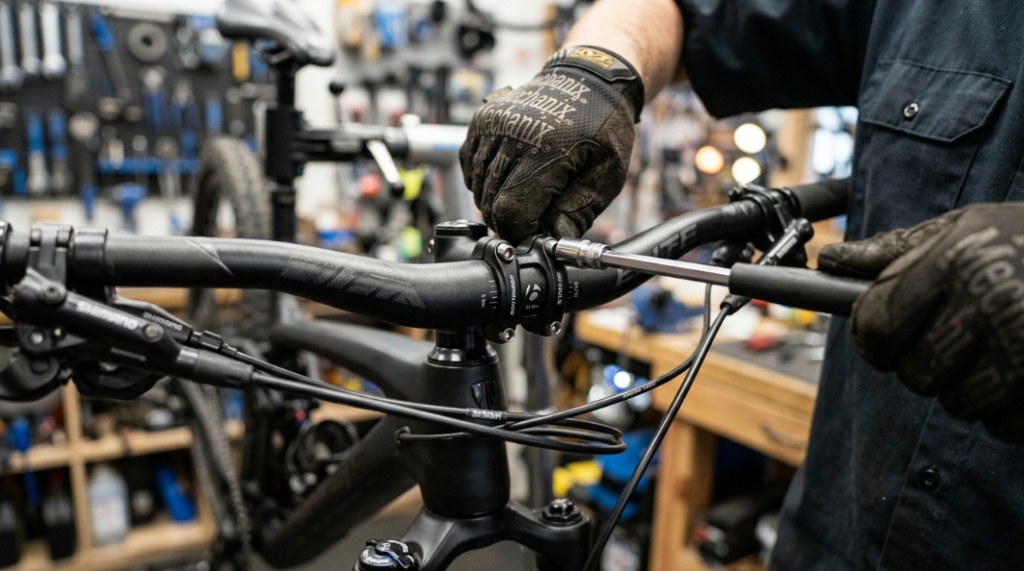
How Do You Install the Handlebars Correctly?
To install the handlebars correctly, center them with the front wheel and tighten the faceplate bolts evenly.
The handlebars usually arrive rotated sideways for packaging. Remove the stem faceplate bolts using an Allen wrench, position the handlebars comfortably, and reinstall the plate.
What Is the Correct Handlebar Position?
The correct handlebar position keeps the grips level and aligned with the rider’s natural wrist angle.
Follow these tips:
- Center the handlebars evenly
- Align bars perpendicular to the front wheel
- Tighten bolts gradually in an X-pattern
- Leave equal gaps on the stem faceplate
Uneven tightening can crack the clamp or create unstable steering.
How Tight Should Handlebar Bolts Be?
Handlebar bolts should feel firmly secure without overtightening.
If your bike includes torque specifications, follow them exactly. Most mountain bike stem bolts range between 5–8 Nm.
How Do You Attach the Front Wheel Safely?
The front wheel must sit evenly inside the fork dropouts with the axle fully secured before riding.
This step is critical because incorrect wheel installation creates dangerous steering instability.
How Do You Install the Front Wheel?
Lift the fork slightly, guide the wheel into the fork dropouts, and ensure the axle sits fully in place.
Depending on your Huffy Stone Mountain model, the wheel may use:
- Axle nuts
- Quick-release skewer
If using axle nuts:
- Tighten each side evenly
- Check wheel centering
- Spin the wheel to confirm smooth rotation
If the wheel rubs the brake pads continuously, it may not be centered properly.
How Can You Tell if the Front Wheel Is Installed Correctly?
A correctly installed front wheel spins freely without wobbling and stays firmly secured when pulled sideways.
Always test by lifting the front end slightly and spinning the tire.
How Do You Install Bike Pedals the Right Way?
Bike pedals must be installed on the correct sides because pedal threads are directional.
This is one of the most common beginner mistakes in bike assembly.
Which Pedal Goes on Which Side?
The right pedal installs clockwise, while the left pedal installs counterclockwise.
Most pedals are marked:
- R = Right side
- L = Left side
Before tightening:
- Apply grease to threads
- Thread pedals by hand first
- Use a wrench only after smooth threading begins
Cross-threading damages crank arms permanently.
How Do You Adjust the Seat and Seatpost?
The seat should be adjusted to allow a slight knee bend at the bottom of the pedal stroke.
Insert the seatpost into the frame while respecting the minimum insertion line.
What Is the Correct Saddle Height?
The correct saddle height allows efficient pedaling without overextending your legs.
Here is a quick beginner setup method:
- Sit on the saddle
- Place heel on pedal
- Pedal to lowest point
- Leg should become almost straight
After normal foot positioning, your knee should remain slightly bent during pedaling.
How Do You Inflate Mountain Bike Tires Correctly?
Mountain bike tires should be inflated according to the PSI range printed on the tire sidewall.
Many boxed bikes arrive underinflated for shipping safety.
What PSI Should a Huffy Stone Mountain Tire Have?
Most Huffy Stone Mountain tires perform well between 35–50 PSI depending on rider weight and terrain.
| Riding Type | Recommended PSI |
|---|---|
| Pavement riding | 45–50 PSI |
| Light trails | 35–45 PSI |
| Mixed terrain | 40–45 PSI |
Overinflated tires reduce traction, while underinflated tires increase rolling resistance and pinch-flat risk.
How Do You Check the Brakes Before Riding?
You should always test both brakes completely before the first ride.
Improper brake adjustment is one of the leading causes of unsafe first rides on newly assembled bicycles.
How Do You Test Bike Brakes Properly?
Squeeze both brake levers individually and ensure the pads contact the rim evenly.
Look for these signs:
- Brake levers should not touch handlebars
- Brake pads should hit rim squarely
- Wheel should stop immediately
- No excessive cable looseness
If the brakes squeal loudly or rub constantly, pad alignment may need adjustment.
Why Are Bike Brakes Sometimes Weak After Assembly?
New brake cables can stretch slightly after initial use, reducing braking power.
After your first few rides, recheck cable tension and pad positioning.
How Do You Adjust the Gears on a Huffy Stone Mountain Bike?
The gears should shift smoothly across all cogs without chain skipping or grinding noises.
Many entry-level mountain bikes need minor derailleur adjustments after shipping.
What Causes Poor Gear Shifting After Assembly?
Poor shifting usually happens because of cable tension issues or derailleur misalignment.
Common symptoms include:
- Chain hesitation
- Skipping gears
- Clicking noises
- Chain falling off
You can often fix small shifting problems using the barrel adjuster near the shifter.
How Do You Fine-Tune Bike Gears?
Turn the barrel adjuster slowly while pedaling and shifting.
- Counterclockwise = increases cable tension
- Clockwise = reduces cable tension
Make quarter-turn adjustments only.
Should You Lubricate the Chain Before Riding?
Yes, checking and lightly lubricating the chain improves drivetrain performance and reduces wear.
Some factory chains include minimal protective coating instead of full lubrication.
What Type of Lubricant Should You Use?
A standard bicycle chain lubricant designed for wet or dry riding conditions works best.
- Dry lube for dusty environments
- Wet lube for rainy or muddy conditions
Avoid household oils because they attract dirt quickly.
What Safety Checks Should You Perform Before the First Ride?
You should complete a full bolt, brake, and wheel inspection before riding any newly assembled bike.
Professional bike mechanics often use a simple pre-ride checklist.
What Is the ABC Bike Check?
The ABC method stands for Air, Brakes, and Chain.
- Air: Check tire pressure
- Brakes: Test stopping power
- Chain: Confirm smooth drivetrain operation
Also inspect:
- Pedal tightness
- Seatpost clamp
- Handlebar alignment
- Quick-release or axle nuts
Is Professional Bike Assembly Better Than DIY Setup?
Professional assembly offers greater precision, but many riders can safely assemble a Huffy Stone Mountain bike at home using proper instructions.
| DIY Assembly | Professional Assembly |
|---|---|
| Lower cost | Higher precision tuning |
| Good learning experience | Faster setup |
| Requires tools and patience | Usually includes safety inspection |
| May require later adjustments | Optimized brake and gear setup |
If you are unfamiliar with brake or derailleur adjustments, a local bike shop inspection after assembly is a smart investment.
What Are the Most Common Huffy Stone Mountain Assembly Mistakes?
The most common mistakes involve pedals, wheel alignment, loose bolts, and brake setup.
What Mistakes Should Beginners Avoid?
Avoid these common assembly problems:
- Installing pedals on wrong sides
- Overtightening stem bolts
- Riding with underinflated tires
- Ignoring loose axle nuts
- Skipping brake tests
- Misaligning handlebars
- Forgetting chain lubrication
Even small setup errors can reduce safety and bike lifespan significantly.
Can You Upgrade a Huffy Stone Mountain Bike Later?
Yes, many riders upgrade tires, saddles, pedals, and drivetrain parts over time.
The Huffy Stone Mountain is considered an entry-level mountain bike, but strategic upgrades can improve comfort and performance.
What Upgrades Make the Biggest Difference?
These upgrades usually provide the best value:
- Better pedals
- Comfort saddle
- Improved tires
- Higher-quality brake pads
- Lock-on grips
For casual trails and commuting, these improvements can noticeably enhance ride quality.
Conclusion
Assembling a Huffy Stone Mountain bike the right way is less about speed and more about precision. A properly installed front wheel, aligned handlebars, secure pedals, tuned brakes, and correctly inflated tires all contribute to safer riding and better long-term performance.
This complete bike setup guide showed how to inspect, assemble, adjust, and safety-check every major component before your first ride. Following these mountain bike assembly tips helps prevent common beginner mistakes like loose bolts, poor shifting, brake rubbing, and wheel instability.
Whether you are building the bike for commuting, fitness, trail riding, or casual neighborhood rides, careful setup makes a noticeable difference immediately. Take your time during assembly, double-check every connection point, and perform regular maintenance after the first few rides.
If you found this guide useful, save it for future maintenance checks and share it with other new mountain bike owners who want a safer, smoother first ride experience.
Frequently Asked Questions About Huffy Stone Mountain Bike Assembly
How long does it take to assemble a Huffy Stone Mountain bike?
Most beginners can assemble a Huffy Stone Mountain bike in 45–90 minutes depending on experience and tool availability.
Do Huffy bikes come partially assembled?
Yes, Huffy bikes typically arrive around 85% assembled with the drivetrain and rear wheel already installed.
Can I assemble a Huffy Stone Mountain bike without professional help?
Yes, many riders successfully assemble the bike at home using basic tools and careful instructions.
Do I need a torque wrench for bike assembly?
A torque wrench is optional but recommended because it helps prevent overtightening bolts and damaging components.
Why does my bike chain skip after assembly?
Chain skipping usually happens because the derailleur cable tension needs adjustment or the derailleur alignment shifted during shipping.
How often should I check bolts after assembly?
You should inspect major bolts after the first few rides because vibrations can loosen newly assembled parts.
What should I do if the brakes rub the wheel?
Brake rubbing usually means the wheel is not centered correctly or the brake pads need realignment.
📌 Related Reads
Discover: Ideal AC settings for better sleep
Explore: Six Key Functions Of A Well-Designed School Website

